How we do React Native CI/CD at Bluesky - At Nearly Zero Cost
Poorly written by hailey on July 8, 2024In the current ecosystem, the best way to run CI/CD for your React Native application is absolutely by using Expo Application Services. The simplicity is great, and the services offered - especially Expo Updates - are well worth the cost whenever developing your apps. However, when building an application at scale - that is being used by hundreds of thousands or millions of users - the costs can quickly start becoming unmanageable. So, what is there to do?
How did we get where we are today?
Whenever I first started working on Bluesky as an OSS contributor, the initial motivation - and a selfish one at that - was so that I could have a little client of my own that fixed up some of the nits I had with the official app, even if they never landed in the official repo (I never expected this to go just the way it did, but that's a different story!) It was great, I could stay up to date with all the most recent fixes as well as my own changes just by creating some builds locally every so often.
Whenever I joined the team though, I expected this need to go away. I (annoyingly) had to remove Expo Updates configuration blocks from the app's config to build it locally, so I thought maybe we'd have an OTA flow going, or at least have regular builds being delivered via TestFlight. It turns out though that we didn't!
Immediately, I grew annoyed that it was difficult to do any QA at all on what we were putting into releases. Sure, we could checkout PRs, run them locally on a simulator, and feel 90% confident that things were solid. But as anyone who has worked with React Native knows, there's just really no way to be 98% confident without actually using the thing on a real device - especially on multiple platforms. We'd merge in 40 PRs in a week but never actually test them all together until the night we cut a release and submitted it to the app stores for review! I figured I'd make this my first big contribution as a core team member.
Just deploy regularly to TestFlight
As someone who could just build the app whenever I felt like it, the only desire that I personally had at the time was to make this process a little easier. All that we really needed was an internal release system that would let us test recent changes to the app internally - prior to deciding to cut a release. Even in the short time that I was on the team without a proper CI/CD flow, we caught a number of obvious "oopsies!" bugs at the last second - and some even made it through QA all together. By obvious here I'm talking about "that background color is obviously inverted" or "there's a debug popup at the end of that flow". Little things. So, the natural first step that I implemented was to just run a new TestFlight deploy every day at 9PM. Cool!
But I'm a night owl...and some of the other people on the team are too! We fairly often were merging something into main after 9PM! Now we had to wait until the next day to see the results? To that end, the answer seems simple. We could just create a little GitHub action to a new IPA and APK then release it internally - all on a free GitHub Action! There's a problem here though. Building the app on a GitHub runner takes a long time! Did we really want to have to wait 20-30 minutes per merge into main? Of course, this is just an inconvenience...it seems fine I guess.
However, there's another - more problematic - problem with this flow. It isn't too useful for myself and the handful of people on the Bluesky app team to be the only ones testing the app. We wanted the entire team to have access to it and be regularly using it. And while most of the team who uses iOS is in the TestFlight group, they don't necessarily know to go download the latest update - and TestFlight's automatic downloads are not super reliable. Not to mention that this didn't solve the problem for Android users - they'd need to download the new APK through Slack and sideload it all the time...this was seeming a little more convoluted than what we wanted it to be.
OTA Updates
Okay, so we know that just doing regular TestFlight releases and APK builds won't cut it. Our daily workflow is nice but isn't nearly as effective as we want for it to be. It is time to look at other solutions. And, in the current ecosystem, the only other option looks like Expo Updates.
Whenever Expo Updates is talked about - at least from my experience - people are generally referring to it as the great service offered through EAS. However, it's important to know that Expo Updates is a protocol and using Expo Updates with your React Native app does not require using Expo's EAS service. In fact, the Expo team has even created a sample custom Expo Updates server that you can base your own implementation on!
With this in mind, we decided to create our own updates service (big shoutout to Jake Gold for putting this together!) that would work with Expo's expo-updates package. In just a matter of days, we were able to start delivering updates to our internal users in minutes - all without them needing to often update their apps in TestFlight or sideloading new APKs. A lot of the bugs that very likely would have slowed things down or even gotten through into production were getting caught! And after about a month of testing internally, we were able to start delivering OTA hotfixes to our users in production, all in an extremely seamless way. And all we needed was GitHub, a CDN, and a server.
A quick note about OTA updates
First, it's important to understand at least a little bit of how OTA updates and work and both what we can and cannot deliver via an OTA update. Expo's documentation gives a good overview of how the process works. Essentially, the Expo Updates library will:
- Request a manifest from either their own EAS service or your own service that uses the Expo Updates protocol. This manifest includes information such as whether an update is available (your server will determine this based on information that is sent with the request) and where to download the assets for the update if one is indeed available.
- Download the assets for the available update if needed. This process will happen in the background - and users do not need to be aware of this taking place at all.
- Apply the new update at a time that you can configure. For example, you generally will want to wait for the app to be restarted or for a user to have left the app idle for some time. However, when a serious hotfix needs to be delivered, you can also deliver a forced update to users - one that will cause the app to immediately restart once downloaded.
{
  "id": "4e59a22d-eea9-b284-d075-46219872e3d8",
  "createdAt": "2024-06-06T18:17:34+0000",
  "runtimeVersion": "1.85.0",
  "launchAsset": {
    "hash": "iyoNpSWQx2IUxpapJmoeMEUaEU0F5biqm7UCL8ifuEE",
    "key": "4748cb7342f527ed7558816593cfb64b",
    "contentType": "application/javascript",
    "url": "https://updates.bsky.app/file/1.85.0/1717697851/bundles/4748cb7342f527ed7558816593cfb64b.bundle"
  },
  "assets": [
    {
      "hash": "NlpPDluiWSDTmv6N9OPB14UcBAHWQBOy0hO3w_UdGUg",
      "key": "cb07b7f3ef0bc123af12381f5836f248",
      "contentType": "image/png",
      "fileExtension": ".png",
      "url": "https://updates.bsky.app/file/1.85.0/1717697851/assets/cb07b7f3ef0bc123af12381f5836f248.png"
    }
  ],
  "metadata": {
    "androidBuildNumber": "214",
    "channel": "testflight"
  }
}
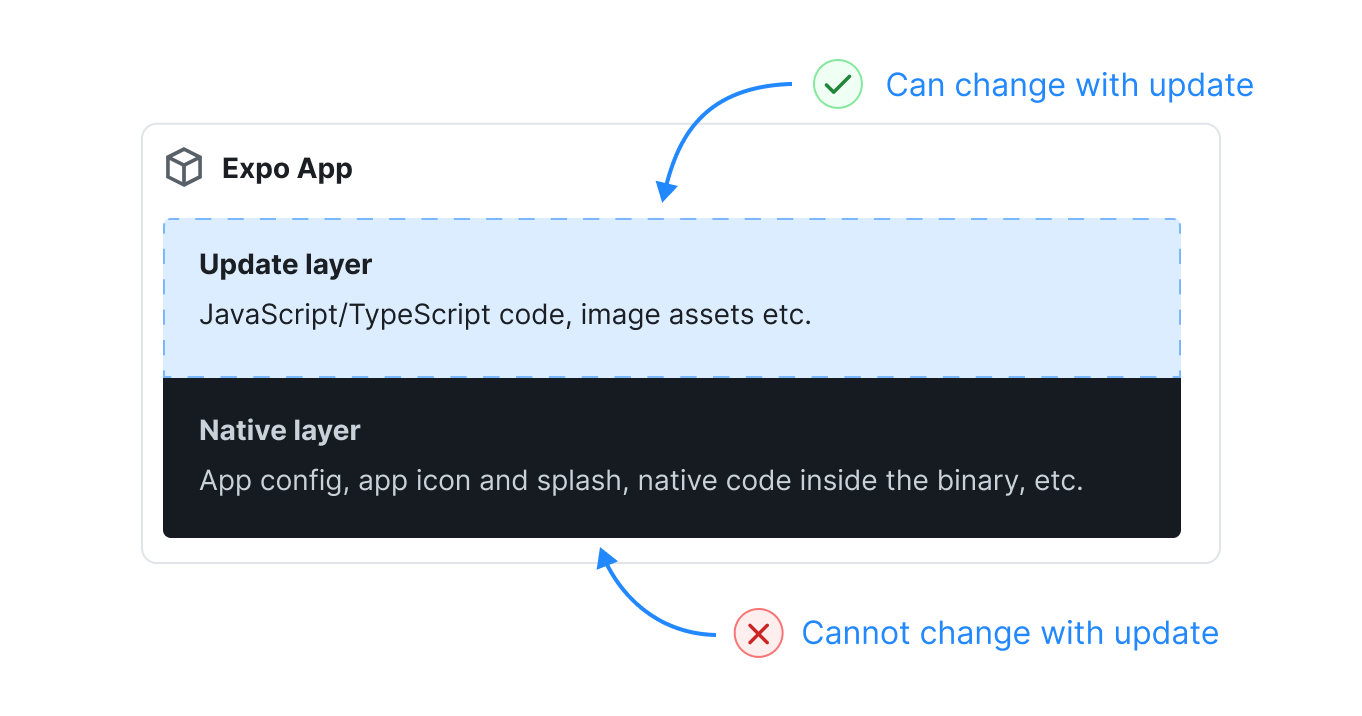
Notice that the only things that are packaged and available for download are asset files like images and the Javascript bundle. This is the important thing to remember here: if you introduce native changes to your app, you will need to rebuild the client, and will not be able to deliver your changes merely through an OTA update. There is a lot of documentation on this around Codepush and Expo Updates, so I will defer to those for more information on this.
Another amazing tool from Expo is their fingerprinting tool. Given two separate commit hashes, this tool can determine if any of the changes in the code have introduced new native dependencies or changes - among many other things like NPM package additions/deletions, yarn lock changes, etc. We will be worried only about the native changes. They have some useful GitHub actions in their GitHub Actions repo. I have personally opted to create my own action, which can be found in the Bluesky Social GitHub Actions repo.
So how do I put this thing together?
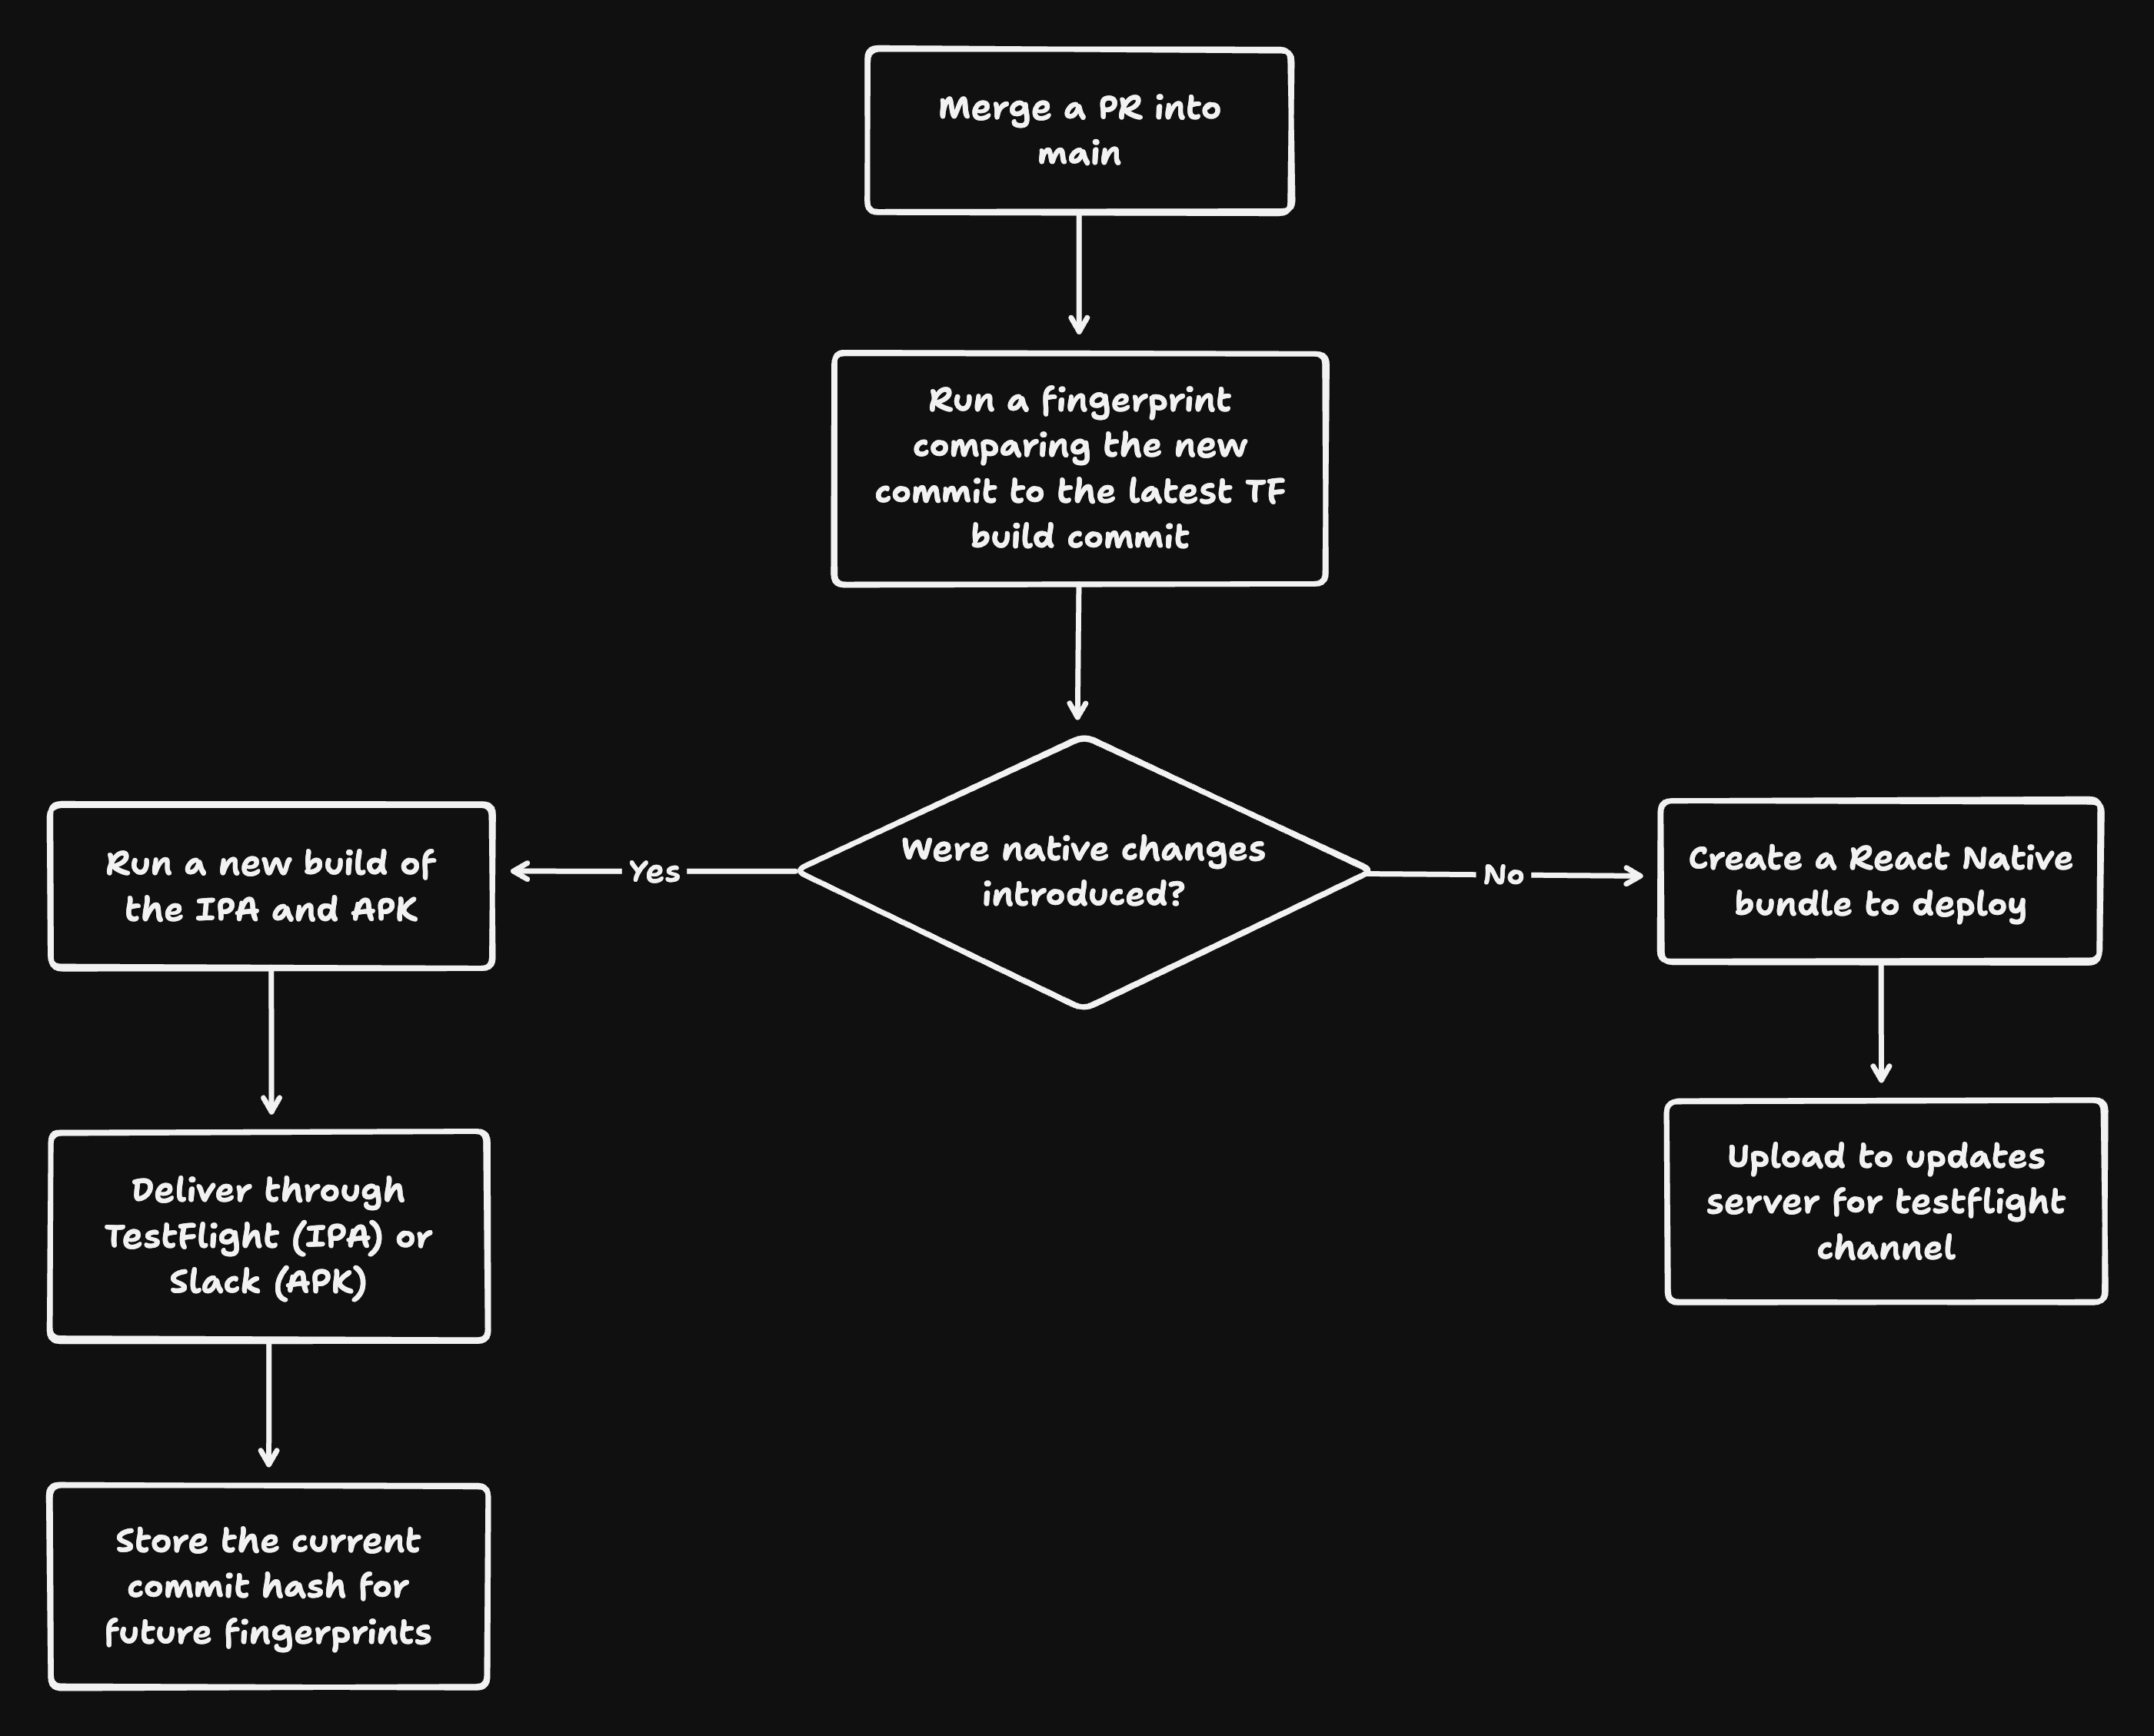
Let's start with setting up our TestFlight CI/CD workflow and figuring out what exactly we are looking for out of this workflow.
- Every time we merge something into main, we want to release the changes internally
- We need to determine if native changes were made between the newly merged PR and the previously deployed TestFlight client.
- If changes were introduced, we should deploy a new client via TestFlight (and Slack for Android APKs). However, if no changes were made, we should blast off a new bundle to our OTA service (or EAS Updates if that is what you're using).
Next, let's think about how we want OTA deployments into production to work. We already know we need to keep track of which clients support which OTA deployments. We keep track of commit hashes to do that internally, which works great because so many merges are happening 24/7. However, we want something a little more visible - and a little more reliable than GitHub Action caches - to keep track of this for production. The great news is that we can just properly tag the commit we cut a client release from (i.e. what we send off to the App Store) and use that as a reference!
For Bluesky's use case, we also know that we don't want to just deliver all of the changes we land on main through OTA updates. We only plan on using this for hotfixes. That means we'll just be merging things into main and creating a branch of cherry picks to deliver production OTAs with.
With all of that in mind, we start to get a sense of what we want our GitHub workflow to do and what inputs it will need. Let's take a look.
The workflow
If you just want to take a look at the workflow itself or want to follow along, feel free to check it out in our repo. Don't mind the mess, I certainly don't like these things and am not the best at writing them! 😝
Collect our inputs
We start things off with two possible conditions for running the OTA deployment:
- A commit is pushed to main (a PR being merged)
- A
workflow_dispatchtrigger that can be manually ran by those with write access to the repo
Notice that the workflow_dispatch block also includes a few inputs. These are channel and runtimeVersion. These let us submit a bundle to our OTA service and let it know if the deployment is capable of running on a particular client version (i.e. 1.82.0) and if it should be delivered to people using the production app or only those running an internal client.
Note that these are not the only two values that determine if a client should receive an update. We also use the client's bundle version (iOS) or version code (Android) for determining eligibility for a particular OTA update. However, we get that information from EAS, which we will do in a later step.
By supplying the client runtime version in the workflow_dispatch block, we will be able to safely run deployments to production by fingerprinting the selected branch's latest commit against the commit tagged with that version code! Mistakes can happen, let the computer make the determination for you! And on that note...
Fingerprint!
Next, we need to make sure that either
- The latest TestFlight client can support this OTA update, if we selected
testflightin theworkflow_dispatchblock or if no input was supplied - indicating this was a push to main. - The client that was built from the tagged version code can support this OTA update if we're deploying to production.
To that end, we will use @expo/fingerprint alongside our fingerprinting GitHub action.
For TestFlight we:
- Try to find the latest TestFlight release's commit hash in the GitHub Actions cache.
- Checkout that commit, install dependencies, and perform a fingerprint. If no last commit was found, we just default to the previous commit (note that this isn't fool proof. One alternative would just be using the latest tagged commit.)
- Checkout the current commit, again install dependencies, and perform another fingerprint.
- Compare the two fingerprints.
- Output the response. If the comparison finds any native changes (indicated with the reasons
bareRncliAutolinking,expoAutolinkingAndroid, orexpoAutolinkingIos), we will output true forincludes-changes, otherwise we'll output false.
For production, we do the same thing, except for step 2. we checkout the commit for the given tag instead of getting the commit hash from the cache.
With this information, we can determine if we want to create a bundle and deploy it to our OTA service or if we just want to build a new IPA/APK and deliver those via TestFlight and Slack.
And how does the app work?
Thankfully most of this work is already done for us! We have a little hook inside of our app that checks for an update after launching, then:
- If there's a new update and the user is an internal user, tells the user to relaunch the app.
- Continues checking for an available update every 15 minutes the user has the app foregrounded.
- After the app has been backgrounded for at least 15 minutes, will relaunch the app on foreground if an update has already been downloaded and is pending being applied.
- Note that the 15 minute window is completely up to you. 15 minutes is generally a good amount of time where we can assume the user is not actively doing something in the app, so relaunching won't cause the user to lose their place. This is also rather rare, so the user won't run into it very often.
Our app config specifics that updates should be fetched from our service instead of EAS.
 updates: {
   url: 'https://updates.bsky.app/manifest',
   enabled: UPDATES_ENABLED,
   codeSigningCertificate: UPDATES_ENABLED
     ? './code-signing/certificate.pem'
     : undefined,
   codeSigningMetadata: UPDATES_ENABLED
     ? {
         keyid: 'main',
         alg: 'rsa-v1_5-sha256',
       }
     : undefined,
   checkAutomatically: 'NEVER',
   channel: UPDATES_CHANNEL,
 },
Note that you can have the app check for updates at various times, like immediately at launch. You can check the Expo documentation for different options.
What else could we do?
If you decide to use EAS itself, there are some great built-in features like deploying specific bundles for branches. This is great for internal development! This is also something that we could do ourselves if we wanted to add the functionality to our OTA updates server, and one day maybe we will!
We could also be more aggressive with when we install updates. For example, we could adjust the configuration to download the update on launch and set the fallback time to something like 5 seconds - which would allow most users to download the update before the splash screen disappears. If the download exceeded 5 seconds, the app would fallback to the previous bundle and continue downloading the new one in the background - applying it on the next app restart.
The TL;DR is that this has already paid off a couple of times for us in production, and has significantly helped us in doing internal QA of new features before they get put into production, even with a very small team. Of course, it helps that a lot of us are active app users, so mileage may vary :)